How to Season a New Smoker
A new smoker arrives coated in manufacturing oil and bare metal. One long, empty, hot fire before the first cook burns that off and leaves behind the thin varnish that protects the steel. Here is what the burn is for, how long it takes, and what changes by cooker type.
How this is funded: we earn a commission if you buy through our links, at no extra cost to you. It never changes which product we recommend, and we’ll tell you plainly when we’d skip one. Full disclosure.
Season a new smoker before you cook anything in it: one empty fire, two to three hours at roughly 250 to 300°F, with wood on for the last hour. That burns off the manufacturing oils and metal dust a new cooker arrives carrying, and leaves behind a thin dark coating that slows rust on bare interior steel. It takes an afternoon, it costs one chimney of charcoal, and the first brisket you cook afterwards will not taste faintly of new metal. If your maker’s manual states a temperature or a duration, use theirs over ours — they know what is inside their cooker.
What you are actually burning off
Three things, and they are the reason this is not optional on a bare-steel cooker.
Manufacturing residue.Steel is cut, pressed, welded and shipped with oils and release agents on it, and some of that survives into your garden. None of it is food. An empty fire gets rid of it while there is nothing in the chamber to absorb it, which is the whole trick — the alternative is driving it into the first brisket you cook, during the hours when its surface is coldest and most receptive to whatever is in the air.
Paint and coating cure. Most cookers ship with a high-temperature paint on the outside that finishes curing the first time it gets properly hot. Expect a smell and possibly some visible smoke off the exterior on the first burn. That is normal, it happens once, and it is another reason the first fire should not have food over it.
Bare metal, waiting to rust.Interior steel that is not coated will rust, and the coating is not something you paint on — it is something smoke and fat build up over time, the same process that blackens a cast-iron pan. The seasoning burn gets the first layer on before the weather gets a chance to do its own thing.
What the burn does not do
It does not add flavor to anything. There is a persistent idea that a seasoned pit “tastes” of its history and that a seasoning burn starts banking that flavor. What actually tastes of anything is the fire you build on the day and the wood you put on it — which is the subject of our wood roundup and the smoke ring page. A well-seasoned chamber is a protected chamber, not a flavored one.
It also does not fix a leaky cooker. Several budget offsets ship with seams and door gaps that leak badly, and the fix is a gasket or high-temperature sealant, not a longer burn. Our offset roundupis explicit about which cookers expect that work: the Char-Griller Smokin’ Pro’s own spec notes name leaky seams out of the box, and the Oklahoma Joe’s Highland’s note says some seam-sealing and a seasoning cook are expected. Do the sealing first, while the cooker is cold, and then season it.
The procedure, step by step
- Read the manual. Not a formality. Some makers specify a temperature, some a duration, some tell you explicitly not to oil the interior. Theirs wins.
- Assemble it completely, then wipe the chamber out with a damp cloth to get rid of dust and packing debris. No detergent on cast iron or on a ceramic firebox.
- Oil bare interior steel and the grates thinly, where your maker allows it, with a high-smoke-point cooking oil on a cloth. Thin is the operative word. A thick coat will not cure; it will go sticky and then flake.
- Light charcoal in a chimney— never with lighter fluid, for the reason in the FAQ below — and bring the cooker up gradually to around 250 to 300°F. Let it settle there rather than chasing it.
- Hold it for two to three hours. This is the part people cut short. The thick parts, the firebox and the far end of a long chamber take a long time to get hot enough to matter.
- Add two or three wood chunks for the last hour. The smoke is what lays down the dark coating; heat alone mostly just cleans.
- Shut it down and let it cool completely, then look inside. You want dull, dark and dry. Shiny bare patches mean that spot never got hot; sticky patches mean too much oil.
What changes by cooker type
| Cooker | What the burn is mainly for | What to watch |
|---|---|---|
| Offset / barrel (bare steel) | Both jobs: burn-off and building a protective coating | Seal the seams first. The end furthest from the firebox needs the longest. |
| Bullet / drum | Burn-off, plus coating the interior and the grates | Porcelain-enameled bodies need no oil; the bare grates still do. |
| Ceramic kamado | A gentle first fire, not a seasoning burn | Bring it up slowly — thermal shock is the risk. Nothing to oil. |
| Pellet grill | Burn-off, and priming the auger and fire pot | Follow the maker’s startup routine exactly; it exists for the auger. |
| Electric cabinet | Burn-off only | Run it empty on a high setting with a few chips in the tray. |
| Gravity-fed charcoal | Burn-off, plus coating the chamber and checking the fan and hopper | Use the burn to confirm the controller actually holds a number. |
This table is our reading of what each cooker class is made of, not a set of maker instructions. Where your manual specifies a procedure for your model, follow it.
Use the burn as a rehearsal
The most valuable part of a seasoning burn has nothing to do with the steel. It is three hours of running a brand-new cooker with nothing at stake, and you should spend it learning the thing rather than watching the clock.
Find out which vent setting holds 250°F, and write it down. Find out how long the cooker takes to come up, and how long it takes to come back down after you overshoot — on a kamado that is a genuinely important number, because they overshoot easily and recover slowly. Put a probe at grate level and compare it with the dome gauge, because on most cookers those two numbers differ by more than you would like and you want to know by how much before a brisket is involved. If your chamber is long, move the probe around and map the hot and cool zones; that map is what tells you where to put a brisket on the day. Our fire management guide covers what you are looking for, and the thermometer hub covers the tool that tells you.
Then do the one thing almost nobody does: cook something cheap and forgiving on it before you commit a $90 packer. A pork shoulder or a couple of chickens will teach you the same lessons for a fraction of the stake. When you are ready for the real thing, your first brisket is the shortest honest path through it.
Food safety, briefly
The seasoning burn is also the moment to check the cooker against the basics the USDA sets out for smoking: a smoker that holds a steady temperature, materials intended for food use, and a thermometer you trust rather than a dial you hope about. If anything about the assembly is wrong — a door that will not seal, a grate that does not sit flat, a firebox that distorts when it gets hot — you want to find that out on the empty fire rather than at 3am with a brisket inside.
What a seasoning burn actually needs
Three things, and you will use all three on every cook afterwards, so none of it is single-purpose spending. Prices are live and refresh daily.
The fuel
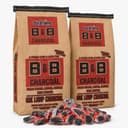
B&B Charcoal Oak Lump Charcoal
A seasoning burn wants clean, low-ash lump rather than anything treated with lighter fluid — you are coating the inside of the cooker with whatever you burn in it.
Read the reviewThe ignition
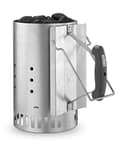
Weber Rapidfire Chimney Starter
Never use lighter fluid in a cooker you are about to season. A chimney gets coals properly lit with nothing but newspaper, and you will use it on every cook afterwards.
$24.99 · View on AmazonSee chimney picksPrice as of October 20, 2026. #ad How we’re funded
The smoke
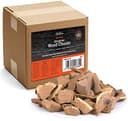
Camerons Products Oak Smoking Wood Chunks
The last hour of the burn is where you want wood smoke rather than just heat, because that is the part that lays down the thin varnish the cooker keeps.
$34.95 · View on AmazonRead the reviewPrice as of October 20, 2026. #ad How we’re funded
Frequently asked questions
Do I really need to season a new smoker?
On anything with bare interior steel, yes, and it takes one afternoon. A new cooker leaves the factory carrying machining oils, release agents and metal dust, and you do not want those in the first thing you cook. The burn-off drives them off while the chamber is empty. The secondary benefit is the coating: smoke and a thin oil film cure into a dark varnish that slows rust on interior steel. On a pellet grill or electric cabinet the main purpose is the burn-off rather than the coating, and it still matters.
How long does it take to season a new smoker?
Plan on two to three hours at temperature, plus the time to come up and cool down — call it an afternoon. Shorter than that and the thicker steel parts, the firebox and the far end of the chamber never get hot enough to do anything useful. Your maker may specify a different duration, and if it does, follow theirs rather than ours.
What temperature should I season a smoker at?
Somewhere around 250 to 300°F is the usual range, and your manual overrides that if it states a figure. The reasoning: you want it hot enough to drive off oils and cure a coating, but there is nothing to gain from running a brand-new cooker at its maximum, and on a ceramic kamado a fast, very hot first fire is actively a bad idea because of thermal shock. Bring it up gradually either way.
Should I oil the inside of a new smoker?
Where your maker says to, and thinly. A light wipe of a high-smoke-point cooking oil on bare interior steel and the grates helps the first coating form. Two cautions. Thin means thin — a heavy coat does not cure, it goes gummy and then flakes into your food. And on a ceramic kamado there is nothing to oil: the interior is glazed or raw ceramic, which does not rust and does not want oil on it.
Do I need to season a pellet grill or an electric smoker?
Both want a burn-off, which their manuals usually call exactly that. On a pellet grill it is a startup routine followed by a period at high temperature with nothing inside, and it has a second job: priming the auger so the fire pot lights properly on the real cook. On an electric cabinet it is simpler still — run it empty at a high setting with a few wood chips in the tray. Neither builds the heavy dark coating an offset does, because there is far less bare steel involved.
Can I season a smoker with lighter fluid or a propane torch?
Never lighter fluid. The entire purpose of this exercise is to stop residue getting into your food, and lighter fluid leaves solvent behind in exactly the surfaces you are trying to clean — in a cooker you have just coated in oil, you are curing the solvent in. Use a chimney starter with newspaper. A propane torch or a looftlighter-style electric starter is fine for lighting the charcoal; just do not let a torch flame play directly on one spot of thin steel for long.
What if the interior comes out sticky or flaking?
Sticky means too much oil, not enough heat or not enough time — run it again, hotter and for longer, and it will usually cure. Flaking means a coating that was applied too thick: knock the loose material off with a brush, wipe it out and start again thinly. Neither has damaged anything. Shiny bare metal in patches just means that area never got hot enough, which on a big offset usually means the end furthest from the firebox.
Do I season it again later, or is once enough?
Once before the first cook, and then every cook maintains it for you — a brisket is twelve hours of smoke and rendering fat laying down more coating. The time to repeat the process is after you have scraped or power-washed a chamber back to bare metal, after a long wet winter has put surface rust on interior steel, or after you have replaced a grate. A properly used smoker never needs a deliberate second seasoning burn.
Sources
- USDA FSIS — Smoking Meat and Poultry — USDA on safe smoking practices, thermometer use and approved smoker materials (accessed July 22, 2026)
- USDA FSIS — Grilling Food Safely — USDA guidance on safe outdoor cooking, thawing and holding (accessed July 22, 2026)
Keep reading
Best Smokers for Brisket
If you have not bought it yet: every cooker class compared on the specs the makers publish.
See all smoker picksBrisket Fire Management
The seasoning burn is a free rehearsal for this — clean fire, steady temperature, thin blue smoke.
Read the guideBest Offset Smoker
The cooker class where seasoning matters most, and the ones that need seam-sealing as well.
See offset picksYour First Brisket
What to do the day after the seasoning burn, cut down to the four decisions that matter.
Read the guideBest Charcoal for Smoking
What to burn in it — and why instant-light charcoal is the one thing to keep out of a new cooker.
See charcoal picksBest Charcoal Chimney Starter
The tool that replaces lighter fluid, which has no place in a smoker you have just seasoned.
See chimney picks